本文细致的剖析了2021 FALL MIT 6.S081 课程的一项实验, Lab 链接 Lab: System calls (mit.edu) 。
大家的点赞将会是我继续更新的巨大动力,对文中内容或实验过程中有任何疑问欢迎留言!
开始 Lab 前首先要切换 git 分支:
 $ git fetch
 $ git checkout syscall
 $ make clean
System call tracing (moderate)
在本实验中,您将添加一个系统调用跟踪功能,该功能会在您调试实验时有所帮助。您将创建一个新的
trace系统调用来跟踪系统调用。它有一个参数,这个参数是一个整数“掩码”(mask),它的比特位与要跟踪的系统调用有对应关系。例如,fork对应的系统调用号为 5 (SYS_fork= 5),要跟踪fork系统调用,程序应调用trace(1 << SYS_fork),其中SYS_fork是 kernel/syscall.h 中的系统调用编号。您应修改 xv6 内核,如果掩码中对应的系统调用的编号置位,则在每个系统调用即将返回时打印一行信息。该信息应该包含 pid 、系统调用的名称和返回值,不需要打印系统调用参数。trace系统调用应跟踪调用它的进程及其所有子进程,但不应影响其他进程。
提示
-
在 Makefile 的 UPROGS 中添加
$U/_trace -
运行
make qemu,您会发现编译器无法编译 user/trace.c ,因为系统调用的用户空间存根还不存在。将系统调用的原型添加到 user/user.h ,存根添加到 user/usys.pl,以及将系统调用编号添加到 kernel/syscall.h , Makefile 调用perl脚本user/usys.pl,它生成实际的系统调用存根 user/usys.s ,这个文件中的汇编代码使用RISC-V的ecall指令转换到内核。一旦修复了编译问题(*注:如果编译还未通过,尝试先make clean,再执行make qemu*),就运行trace 32 grep hello README;但由于您还没有在内核中实现系统调用,执行将失败。
(”存根”(stub)通常指的是一个简单的程序或函数,它的目的是在开发过程中替代或模拟某个功能或组件。存根的主要作用是提供一个占位符,使得程序的其余部分能够继续开发和测试,而不受到尚未实现的组件的影响。)
-
在 kernel/sysproc.c 中添加一个
sys_trace()函数,它将参数保存到proc结构体(请参见 kernel/proc.h )里的一个新变量(掩码)中来实现对系统调用的追踪。从用户空间检索系统调用参数的函数在 kernel/syscall.c 中,您可以在 kernel/sysproc.c 中看到它们的使用示例。 -
修改
fork()(请参阅 kernel/proc.c ),将掩码从父进程复制到子进程。 -
修改 kernel/syscall.c 中的
syscall()函数以打印跟踪过程的输出信息。您需要添加一个系统调用名称数组以建立索引。
补充
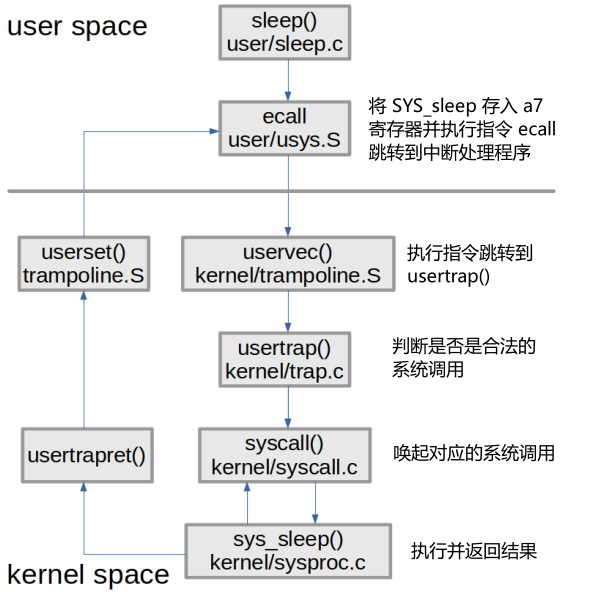
在开始实验前,有必要搞清 xv6 是如何执行系统调用的,以 sleep 为例,后续的实现过程与这张图紧密相关:
实验过程
根据提示,首先需要在 kernel/syscall.h 和 kernel/syscall.c 中增加系统调用的编号及声明。
// kernel/syscall.h
// ...
#define SYS_trace  22
// kernel/syscall.c
// ...
extern uint64 sys_trace(void);
extern uint64 sys_sysinfo(void);

static uint64 (*syscalls[])(void) = {
// ...
[SYS_trace]   sys_trace,
};
同时,需要在 user/user.h 中添加函数原型
// user/user.h
// ...

// system calls
// ...
int trace(int);
// ...
依照实验提示,我们需要在 kernel/proc.h 的 struct proc 结构体中添加一个新的变量 tracenum 来记录被追踪的函数
// kernel/proc.h
// ...
// Per-process state
struct proc {
  struct spinlock lock;

  // p->lock must be held when using these:
  enum procstate state;        // Process state
  void *chan;                  // If non-zero, sleeping on chan
  int killed;                  // If non-zero, have been killed
  int xstate;                  // Exit status to be returned to parent's wait
  int pid;                     // Process ID

  // wait_lock must be held when using this:
  struct proc *parent;         // Parent process

  // these are private to the process, so p->lock need not be held.
  uint64 kstack;               // Virtual address of kernel stack
  uint64 sz;                   // Size of process memory (bytes)
  pagetable_t pagetable;       // User page table
  struct trapframe *trapframe; // data page for trampoline.S
  struct context context;      // swtch() here to run process
  struct file *ofile[NOFILE];  // Open files
  struct inode *cwd;           // Current directory
  char name[16];               // Process name (debugging)
  int tracenum;                // Trace mask
};
在实现系统调用函数之前,我们有必要先看一下 user/trace.c , 看看命令行中 trace 命令是如何被使用的。
// user/trace.c
#include "kernel/param.h"
#include "kernel/types.h"
#include "kernel/stat.h"
#include "user/user.h"

int
main(int argc, char *argv[])
{
  int i;
  char *nargv[MAXARG];

  if(argc < 3 || (argv[1][0] < '0' || argv[1][0] > '9')){
    fprintf(2, "Usage: %s mask command\n", argv[0]);
    exit(1);
  }

  if (trace(atoi(argv[1])) < 0) {
    fprintf(2, "%s: trace failed\n", argv[0]);
    exit(1);
  }

  for(i = 2; i < argc && i < MAXARG; i++){
    nargv[i-2] = argv[i];
  }
  exec(nargv[0], nargv);
  exit(0);
}
首先验证参数数量不小于 3 ,因为 trace 命令的使用格式为:
trace [系统调用号] [命令]
并验证传递的系统调用号合法,开始对 argv[1] 传递的系统调用号进行追踪。
需要被 trace 的命令被复制到新的参数参数列表中,并通过 exec 系统调用开始执行,这一过程中, trace 会持续追踪。
使用示例如下:
$ trace 32 grep hello README
3: syscall read -> 1023
3: syscall read -> 966
3: syscall read -> 70
3: syscall read -> 0
这里我们会发现 user/trace.c 使用的参数为 int 型 trace 函数,仅在 user/user.h 有一个函数原型,而没有具体的函数实现,实际上这里与上面补充内容的图片相对应,这一函数实际上会调用 ECALL 指令,指令的参数是代表了 trace 系统调用的数字,之后控制权到了 syscall 函数, syscall 会实际调用 trace 系统调用。
ECALL 指令属于汇编层面,暂且跳过,下面我们来分析 kernel/syscall.c 中 syscall 函数的代码:
// kernel/syscall.c
// ...
void
syscall(void)
{
  int num;
  struct proc *p = myproc();

  num = p->trapframe->a7;
  if(num > 0 && num < NELEM(syscalls) && syscalls[num]) {
    p->trapframe->a0 = syscalls[num]();
  } else {
    printf("%d %s: unknown sys call %d\n",
            p->pid, p->name, num);
    p->trapframe->a0 = -1;
  }
}
逐行分析这段代码:
struct proc *p = myproc();
跳转查看 myproc() 的函数定义:
// kernel/proc.c
// ...
// Return the current struct proc *, or zero if none.
struct proc*
myproc(void) {
  push_off();
  struct cpu *c = mycpu();
  struct proc *p = c->proc;
  pop_off();
  return p;
}
// ...
myproc() 函数会返回当前运行的进程的指针。 struct proc *p = myproc();获取了当前进程的指针并赋值给变量 p
num = p->trapframe->a7
从当前进程的 trapframe 结构中获取系统调用号,并将其存储在变量 num 中。在 RISC-V 中,系统调用号存储在寄存器 a7 中。
if(num > 0 && num < NELEM(syscalls) && syscalls[num])
检查系统调用号是否在有效范围内,并且确保与该号相关联的处理函数存在。
p->trapframe->a0 = syscalls[num]();
如果条件满足,执行与系统调用号相关联的处理函数,并将其返回值存储在进程的 trapframe->a0 寄存器中。 a0 寄存器用于存储系统调用的返回值。 syscalls[num]() 能执行对应的系统调用处理函数,是因为 kernel/syscall.c 中定义了一个函数指针数组:
// kernel/syscall.c
// ...
// 函数指针数组
static uint64 (*syscalls[])(void) = {
[SYS_fork]    sys_fork,
[SYS_exit]    sys_exit,
[SYS_wait]    sys_wait,
[SYS_pipe]    sys_pipe,
[SYS_read]    sys_read,
[SYS_kill]    sys_kill,
[SYS_exec]    sys_exec,
[SYS_fstat]   sys_fstat,
[SYS_chdir]   sys_chdir,
[SYS_dup]     sys_dup,
[SYS_getpid]  sys_getpid,
[SYS_sbrk]    sys_sbrk,
[SYS_sleep]   sys_sleep,
[SYS_uptime]  sys_uptime,
[SYS_open]    sys_open,
[SYS_write]   sys_write,
[SYS_mknod]   sys_mknod,
[SYS_unlink]  sys_unlink,
[SYS_link]    sys_link,
[SYS_mkdir]   sys_mkdir,
[SYS_close]   sys_close,
[SYS_trace]   sys_trace,
};
syscall 执行结束后,就会执行对应的 sys_trace 函数,我们当前尚未定义这一函数。 提示中提到,我们需要修改 kernel/syscall.c 来打印追踪的信息,而定义在 kernel/sysproc.c 中的 sys_trace 函数只需更新当前进程的 tracenum 即可。
注意到 kernel/sysproc.c 中的函数入参都是 void ,我们需要考虑如何将参数传递给 sys_trace 函数。参考一下 sys_kill 的代码:
// kernel/sysproc.c
// ...
uint64
sys_kill(void)
{
  int pid;

  if(argint(0, &pid) < 0)
    return -1;
  return kill(pid);
}
// ...
可以看到有一个 argint 函数似乎完成了对变量 pid 的赋值操作,我们转到 argint 函数的定义:
// Fetch the nth 32-bit system call argument.
int
argint(int n, int *ip)
{
  *ip = argraw(n);
  return 0;
}

static uint64
argraw(int n)
{
  struct proc *p = myproc();
  switch (n) {
  case 0:
    return p->trapframe->a0;
  case 1:
    return p->trapframe->a1;
  case 2:
    return p->trapframe->a2;
  case 3:
    return p->trapframe->a3;
  case 4:
    return p->trapframe->a4;
  case 5:
    return p->trapframe->a5;
  }
  panic("argraw");
  return -1;
}
注释表明 argint 函数的功能是取第 n 个 32 位系统调用参数,看这两个函数片段可以得知,系统调用参数是通过当前进程的 trapframe 来传递的。这个参数究竟是什么时候到 a0 中的,需要阅读大量汇编代码,这里暂且略过。
获知这些信息后,我们可以开始实现 sys_trace ,利用 argint 函数取得参数值后,将前面为进程结构体增加的 tracenum 设为该函数值即可:
// kernel/sysproc.c
// ...
uint64
sys_trace(void){
  int mask;
  // get the trace mask from the p->trapframe->a0
  if(argint(0, &mask) < 0)
    return -1;
  myproc()->tracenum = mask;
  return 0;
}
根据提示,我们还需要修改 kernel/proc.c 中的 fork() 函数来将 tracenum 从父进程复制到子进程:
// kernel/proc.c
// Create a new process, copying the parent.
// Sets up child kernel stack to return as if from fork() system call.
int
fork(void)
{
  int i, pid;
  struct proc *np;
  struct proc *p = myproc();

  // Allocate process.
  if((np = allocproc()) == 0){
    return -1;
  }

  // Copy user memory from parent to child.
  if(uvmcopy(p->pagetable, np->pagetable, p->sz) < 0){
    freeproc(np);
    release(&np->lock);
    return -1;
  }
  np->sz = p->sz;

  // copy saved user registers.
  *(np->trapframe) = *(p->trapframe);

  // Cause fork to return 0 in the child.
  np->trapframe->a0 = 0;

  // increment reference counts on open file descriptors.
  for(i = 0; i < NOFILE; i++)
    if(p->ofile[i])
      np->ofile[i] = filedup(p->ofile[i]);
  np->cwd = idup(p->cwd);

  safestrcpy(np->name, p->name, sizeof(p->name));

  pid = np->pid;

  release(&np->lock);

  acquire(&wait_lock);
  np->parent = p;
  release(&wait_lock);

  acquire(&np->lock);
  np->state = RUNNABLE;
  release(&np->lock);

  // 复制 tracenum 到子进程
  np->tracenum = p->tracenum;

  return pid;
}
根据提示,当前进程每次执行被追踪的系统调用时都应打印相关信息,因此,应将打印信息的代码添加在 kernel/syscall.c 中 syscall 函数中。这里还需要添加一个系统调用名称数组以建立索引。修改后的 syscall 函数如下所示:
// kernel/syscall.c
// ...
void
syscall(void)
{
  static char *syscall_names[] = {
  [SYS_fork]    "fork",
  [SYS_exit]    "exit",
  [SYS_wait]    "wait",
  [SYS_pipe]    "pipe",
  [SYS_read]    "read",
  [SYS_kill]    "kill",
  [SYS_exec]    "exec",
  [SYS_fstat]   "fstat",
  [SYS_chdir]   "chdir",
  [SYS_dup]     "dup",
  [SYS_getpid]  "getpid",
  [SYS_sbrk]    "sbrk",
  [SYS_sleep]   "sleep",
  [SYS_uptime]  "uptime",
  [SYS_open]    "open",
  [SYS_write]   "write",
  [SYS_mknod]   "mknod",
  [SYS_unlink]  "unlink",
  [SYS_link]    "link",
  [SYS_mkdir]   "mkdir",
  [SYS_close]   "close",
  [SYS_trace]   "trace",
  [SYS_sysinfo] "sysinfo"
  };

  int num;
  struct proc *p = myproc();

  num = p->trapframe->a7;
  if(num > 0 && num < NELEM(syscalls) && syscalls[num]) {
    p->trapframe->a0 = syscalls[num]();
    //在函数返回后,以位运算确认该系统调用是否被追踪
    if((1 << num) & p->tracenum) {
      printf("%d: syscall %s -> %d\n",
            p->pid, syscall_names[num-1], p->trapframe->a0);
    }
  } else {
    printf("%d %s: unknown sys call %d\n",
            p->pid, p->name, num);
    p->trapframe->a0 = -1;
  }
}
这里要解释一下增加的打印信息的判断逻辑,操作系统用一个 32 位掩码来表示要追踪哪个系统调用,即若要追踪系统调用号为 n 的掩码,则将 tracenum 的 n + 1 位置 1 。若当前执行的系统调用正在被追踪,则 1 << num 与 tracenum 相与的结果必然不为 0 ,则 if 条件成立,打印信息。