AQS很难,面试不会?看我一篇文章吊打面试官
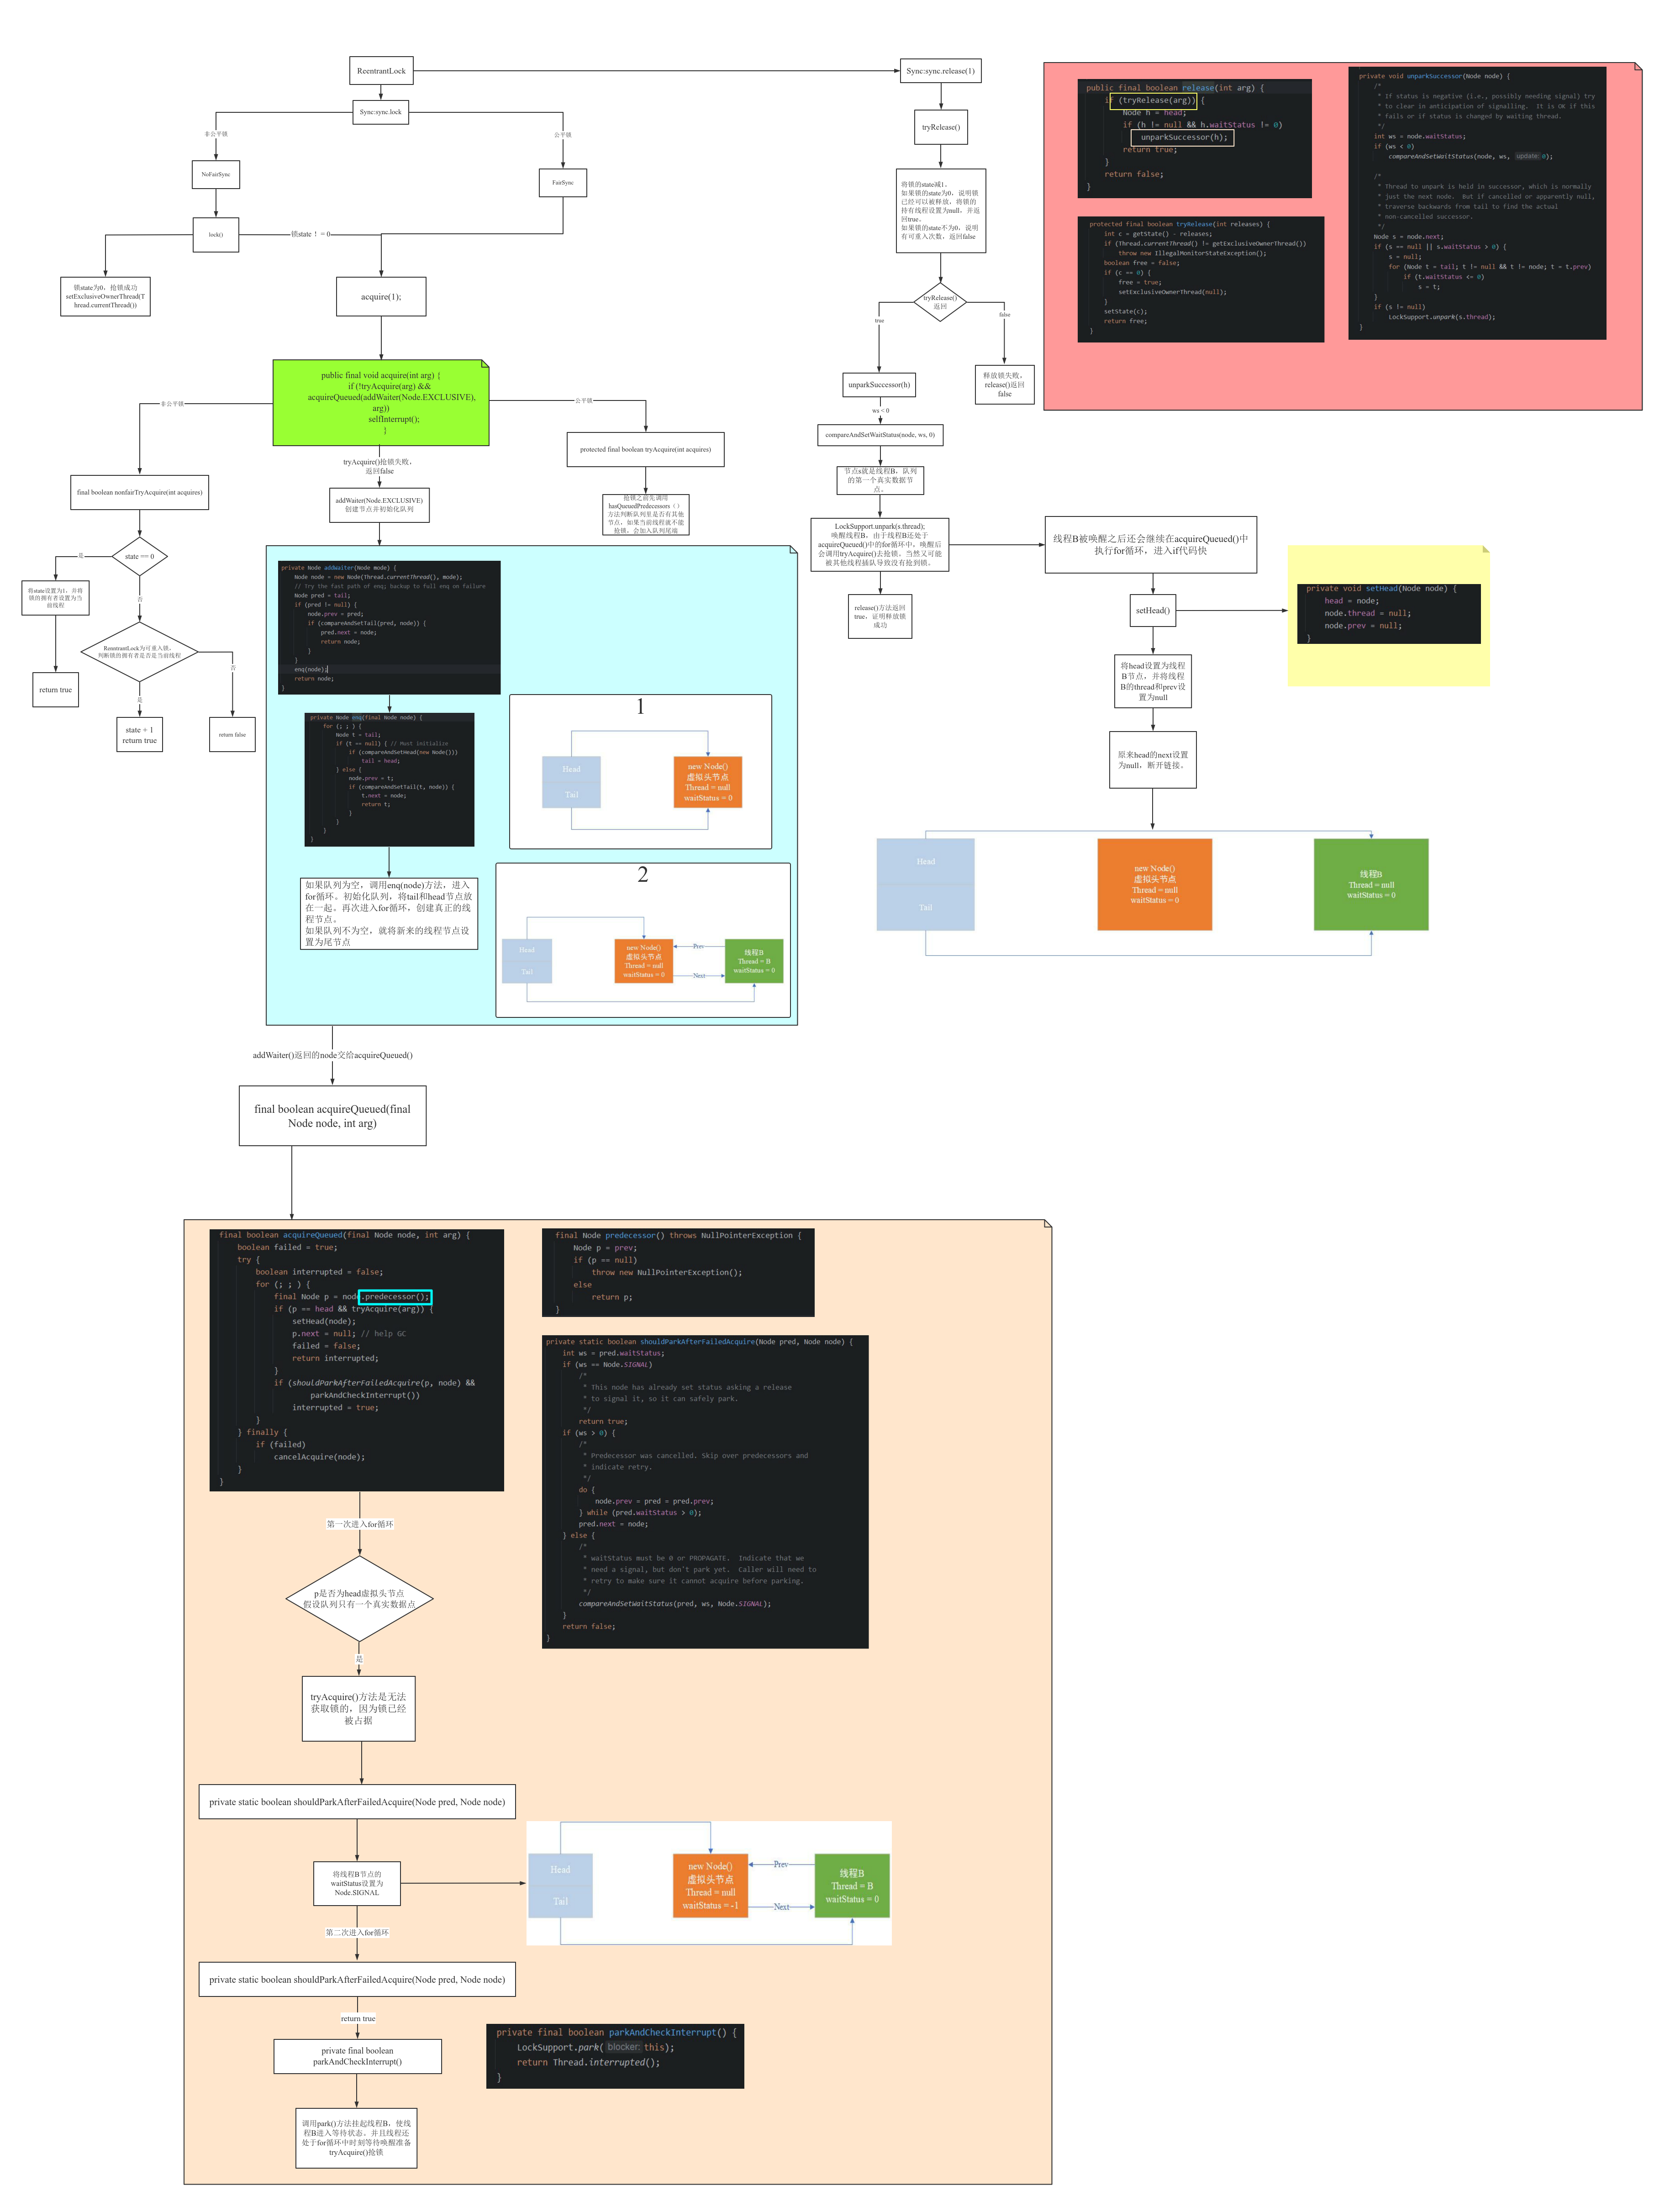
大家好,我是小高先生。在这篇文章中,我将和大家深入探索Java并发包(JUC)中最为核心的概念之一 — AbstractQueuedSynchronizer(AQS)。AQS不仅是构建JUC底层体系的基石,更是掌握并发编程不可或缺的一环,也是当下面试中常考问题。如果我们在学习JUC时忽略了AQS,那就像是基督教徒失去了耶路撒冷那般不可想象,它的重要性自不必多言。本文我将以ReentrantLock为切入点,深入讨论AQS的原理和使用。本文内容多且复杂,为了方便大家学习,我在文章最后放置了ReentrantLock的流程图,有助于大家更好的掌握AQS。
- AQS概述
- JUC基石-AQS
- AQS重要变量
- AQS源码深入分析
- 总结
AQS概述

我们先从字面上解析AQS的含义。”Abstract”指的是抽象,这通常意味着AQS是一个旨在被继承的抽象类,为子类提供共通的功能模板。紧接着,“Queued”诠释了队列的概念,暗示在高并发环境中,当多个线程竞争同一个资源时,未能获取资源的线程将会被排列在一个阻塞队列中,依次等待获取机会。最后,“Synchronizer”即同步器,强调了AQS的设计初衷——为线程同步提供支持和框架。简而言之,AQS是一个为同步而设计的抽象队列同步器。
我们看一下AQS源码中的解释:
Provides a framework for implementing blocking locks and related synchronizers (semaphores, events, etc) that rely on first-in-first-out (FIFO) wait queues. This class is designed to be a useful basis for most kinds of synchronizers that rely on a single atomic int value to represent state. Subclasses must define the protected methods that change this state, and which define what that state means in terms of this object being acquired or released. Given these, the other methods in this class carry out all queuing and blocking mechanics. Subclasses can maintain other state fields, but only the atomically updated int value manipulated using methods getState, setState and compareAndSetState is tracked with respect to synchronization
AQS提供了一个实现阻塞锁和同步器的框架,它基于一个先进先出(FIFO)的队列。在这个框架中,锁的状态是通过一个整型的原子变量state来表示的。线程可以通过请求获取锁和释放锁的方法来改变这个状态。这个过程可以类比于小董在办事大厅的一个服务窗口处理业务的场景。想象一下,在一个服务窗口,同一时间只允许一个人进行业务处理,而其他的人则需要在排队区等待。为了简单明了地指示当前窗口前的情况,我们可以用两盏灯来模拟:绿灯亮时表示窗口无人使用,红灯亮则意味着有人正在办理业务。这与AQS中的状态变量state的作用机制相似,用以指示锁的占用情况。

这个FIFO的双向队列是基于CLH单向链表实现的,我们通过包含显式的(”prev” 和 “next”)链接以及一个”status”字段,将其用于阻塞同步器,这些字段允许节点在释放锁时向后续节点发送信号,并处理由于中断和超时导致的取消操作。
JUC基石-AQS
为什么说JUC的基石是AQS,JUC并发包中常用的锁和同步器如ReentrantLock、ReentrantReadWriteLock、CountDownLatch、Semaphore等都是基于AQS实现的,以ReentrantLock为例,看下源码:
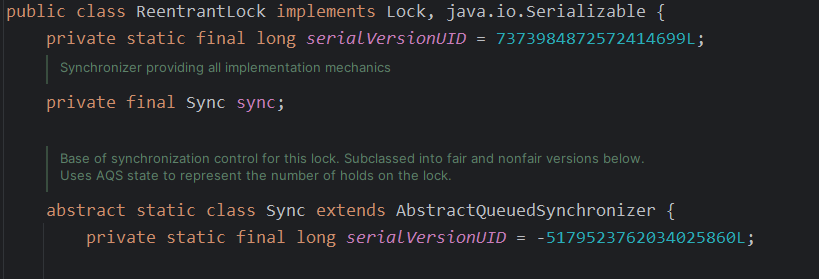
ReentrantLock有一个Sync变量,Sync继承了AQS,所以我们调用ReentrantLock中的一些方法,就是在使用AQS的方法。其他的几个类也都有Sync变量,也是继承了AQS。你能顺利简单的使用这些工具类的方法,是AQS在为你负重前行。
AQS能干的事儿一句话就能表明,多线程抢锁就会有阻塞,有阻塞就需要排队,实现排队必然需要队列。
在多线程环境之中,当多线程竞争同一资源时,通常需要一种机制管理这些线程的执行顺序,以确保资源的有序访问。这种机制需要一个队列数据结构,用于存储等待获取资源的线程。这就是所谓的AQS同步队列。
AQS是一种用于构建锁、信号量等同步器的框架,它使用一个FIFO(先入先出)的队列来管理等待的线程。当一个线程尝试获取被其他线程占据的资源时,他会被放入这个队列中,并进入等待状态,就像去办事大厅排队等待的顾客一样。一旦资源释放,其他线程就有机会获取资源。AQS的核心是状态变量和节点类。每个节点代表一个等待的线程,包含线程的状态信息。状态变量就表示资源的可用性,如资源被占用或者未被占用。AQS通过CAS、自旋、LockSupport.park()方法来维护状态变量和节点队列。
AQS重要变量
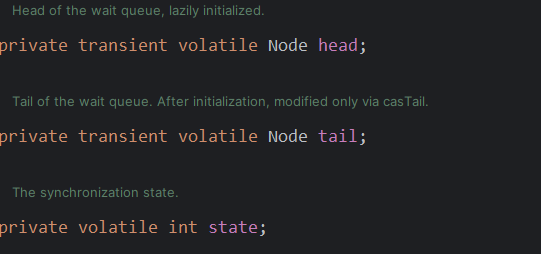
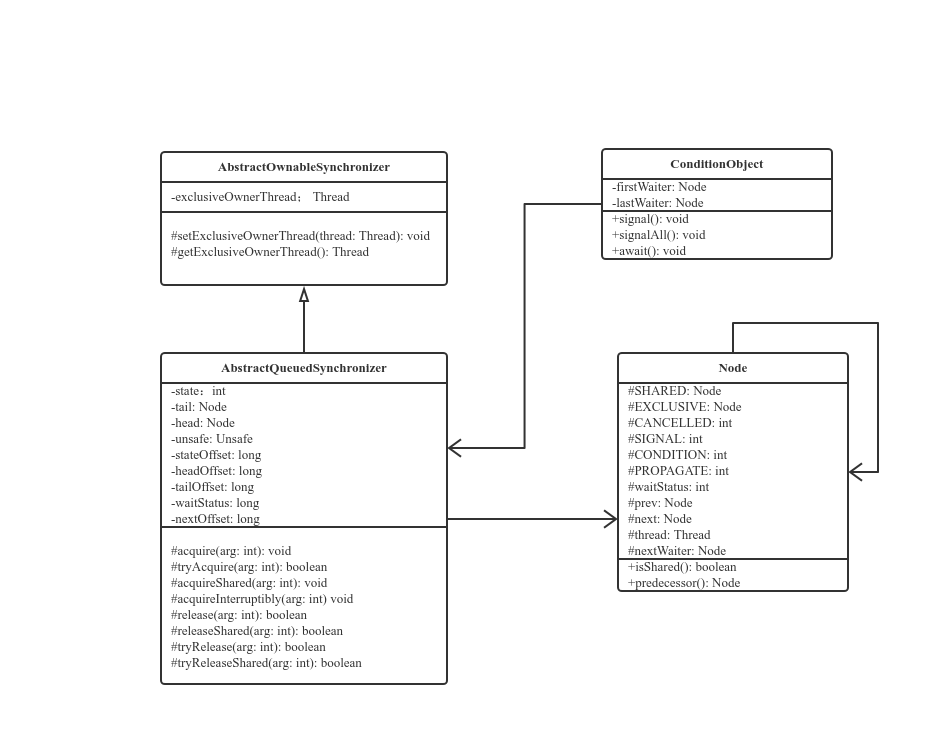
简单看下AQS源码中重要的组成,一个静态内部类Node,头节点和尾节点说明队列是双向的,state为状态变量,表示锁是否被占据。

附一张AQS的类结构图
private volatile int state
AQS的同步状态就是通过state实现的,就类似于办事大厅中的窗口,用state表示是否有人在办理业务。state = 0就是没人,自由状态可以办理;state ≠ 0,有人占用窗口,等着去。可以通过getState()、setState()、compareAndSetState()函数修改state。对于ReentrantLock来说,state就表示当前线程可重入锁的次数。
- AQS的CLH队列
CLH队列(三个狠人名字组成),用于存储等待办理业务的顾客。在CLH队列中,每个节点代表一个等待锁的线程,通过自旋锁进行等待。state变量被用来表示是否阻塞,即锁是否被占用。我们来看一下源码里CLH队列的解释:
The wait queue is a variant of a “CLH” (Craig, Landin, and Hagersten) lock queue. CLH locks are normally used for spinlocks. We instead use them for blocking synchronizers by including explicit (“prev” and “next”) links plus a “status” field that allow nodes to signal successors when releasing locks, and handle cancellation due to interrupts and timeouts.The status field includes bits that track whether a thread needs a signal (using LockSupport.unpark). Despite these additions, we maintain most CLH locality properties.
To enqueue into a CLH lock, you atomically splice it in as new tail. To dequeue, you set the head field, so the next eligible waiter becomes first.等待队列是 “CLH”(Craig、Landin 和 Hagersten)锁队列的一种变体。CLH 锁通常用于自旋锁。 我们将其用于阻塞同步器,方法是加入显式(”prev “和 “next”)链接和一个 “status “字段,允许节点在释放锁时向后继者发出信号,并处理由于中断和超时导致的取消。尽管增加了这些功能,但我们仍保留了大多数 CLH 本地化属性。
要向 CLH 锁传递队列,可以原子方式将其拼接为新的尾部。要取消队列,则需要设置头部字段,这样下一个符合条件的等待者就会成为第一个。
CLH队列的设计使得多个线程可以高效地竞争同一个锁资源。由于每个线程只需要在自己的节点上进行自旋等待,而不需要遍历整个队列,因此减少了不必要的上下文切换和资源消耗。
- Node节点类
Node类在AQS的内部,就是CLH队列中的节点。Node节点就可以理解为办理业务时等待去的椅子,每个椅子上坐一位顾客,里面有顾客的等待状态。
Node相关源码如下所示:
	static final class Node {
        /** Marker to indicate a node is waiting in shared mode */
        static final Node SHARED = new Node();
        /** Marker to indicate a node is waiting in exclusive mode */
        static final Node EXCLUSIVE = null;

        /** waitStatus value to indicate thread has cancelled */
        static final int CANCELLED =  1;
        /** waitStatus value to indicate successor's thread needs unparking */
        static final int SIGNAL    = -1;
        /** waitStatus value to indicate thread is waiting on condition */
        static final int CONDITION = -2;
        /**
         * waitStatus value to indicate the next acquireShared should
         * unconditionally propagate
         */
        static final int PROPAGATE = -3;

        /**
         * Status field, taking on only the values:
         *   SIGNAL:     The successor of this node is (or will soon be)
         *               blocked (via park), so the current node must
         *               unpark its successor when it releases or
         *               cancels. To avoid races, acquire methods must
         *               first indicate they need a signal,
         *               then retry the atomic acquire, and then,
         *               on failure, block.
         *   CANCELLED:  This node is cancelled due to timeout or interrupt.
         *               Nodes never leave this state. In particular,
         *               a thread with cancelled node never again blocks.
         *   CONDITION:  This node is currently on a condition queue.
         *               It will not be used as a sync queue node
         *               until transferred, at which time the status
         *               will be set to 0. (Use of this value here has
         *               nothing to do with the other uses of the
         *               field, but simplifies mechanics.)
         *   PROPAGATE:  A releaseShared should be propagated to other
         *               nodes. This is set (for head node only) in
         *               doReleaseShared to ensure propagation
         *               continues, even if other operations have
         *               since intervened.
         *   0:          None of the above
         *
         * The values are arranged numerically to simplify use.
         * Non-negative values mean that a node doesn't need to
         * signal. So, most code doesn't need to check for particular
         * values, just for sign.
         *
         * The field is initialized to 0 for normal sync nodes, and
         * CONDITION for condition nodes.  It is modified using CAS
         * (or when possible, unconditional volatile writes).
         */
        volatile int waitStatus;

        /**
         * Link to predecessor node that current node/thread relies on
         * for checking waitStatus. Assigned during enqueuing, and nulled
         * out (for sake of GC) only upon dequeuing.  Also, upon
         * cancellation of a predecessor, we short-circuit while
         * finding a non-cancelled one, which will always exist
         * because the head node is never cancelled: A node becomes
         * head only as a result of successful acquire. A
         * cancelled thread never succeeds in acquiring, and a thread only
         * cancels itself, not any other node.
         */
        volatile Node prev;

        /**
         * Link to the successor node that the current node/thread
         * unparks upon release. Assigned during enqueuing, adjusted
         * when bypassing cancelled predecessors, and nulled out (for
         * sake of GC) when dequeued.  The enq operation does not
         * assign next field of a predecessor until after attachment,
         * so seeing a null next field does not necessarily mean that
         * node is at end of queue. However, if a next field appears
         * to be null, we can scan prev's from the tail to
         * double-check.  The next field of cancelled nodes is set to
         * point to the node itself instead of null, to make life
         * easier for isOnSyncQueue.
         */
        volatile Node next;

        /**
         * The thread that enqueued this node.  Initialized on
         * construction and nulled out after use.
         */
        volatile Thread thread;

        /**
         * Link to next node waiting on condition, or the special
         * value SHARED.  Because condition queues are accessed only
         * when holding in exclusive mode, we just need a simple
         * linked queue to hold nodes while they are waiting on
         * conditions. They are then transferred to the queue to
         * re-acquire. And because conditions can only be exclusive,
         * we save a field by using special value to indicate shared
         * mode.
         */
        Node nextWaiter;

        /**
         * Returns true if node is waiting in shared mode.
         */
        final boolean isShared() {
            return nextWaiter == SHARED;
        }

        /**
         * Returns previous node, or throws NullPointerException if null.
         * Use when predecessor cannot be null.  The null check could
         * be elided, but is present to help the VM.
         *
         * @return the predecessor of this node
         */
        final Node predecessor() throws NullPointerException {
            Node p = prev;
            if (p == null)
                throw new NullPointerException();
            else
                return p;
        }

        Node() {    // Used to establish initial head or SHARED marker
        }

        Node(Thread thread, Node mode) {     // Used by addWaiter
            this.nextWaiter = mode;
            this.thread = thread;
        }

        Node(Thread thread, int waitStatus) { // Used by Condition
            this.waitStatus = waitStatus;
            this.thread = thread;
        }
    }
看看一些重要属性:
EXCLUSIVE:表示一个独占节点,即只有一个线程可以获取锁资源,如ReentrantLock。当一个线程成功获取锁时,会创建一个EXCLUSIVE节点对象并将其设置为当前线程的节点状态。当其他线程获取锁时,发现已经有线程持有了锁,则将自身封装成一个EXCLUSIVE节点并加入等待队列中。SHARED:表示一个共享节点,即多个线程可以同时获取锁资源,如ReentrantReadWriteLock。与EXCLUSIVE不同,SHARED允许多个线程同时持有锁,但仍需要循序公平性。当一个线程请求共享锁时,如果锁是可用的,则线程可以直接获取锁;否则,线程会被封装成一个SHARED节点并加入等待队列中。waitStatus:当前节点在等待队列中的状态。- 0:当一个Node被初始化时默认的状态
CANCELLED:当节点在等待过程中被中断或超时,它将被标记为取消状态,此后该节点将不再参与竞争,其线程也不会再阻塞。CONDITION:这表示节点当前在条件队列中等待。线程执行了await()方法后,释放了锁并进入等待状态,直到其他线程调用signal()方法。在条件队列中的节点可以被移动到一个特殊的条件等待队列,直到条件得到满足。有关条件队列的内容我将在之后的文章中讲解。SIGNAL:线程需要被唤醒PROPAGATE:这个状态通常用于共享模式,当一个线程释放锁或者资源时,如果头节点是PROPAGATE状态,它会将释放操作传播到后续的节点,以便这些节点也能尝试获取共享资源。
AQS源码深入分析
以最常用的ReentrantLock作为突破口进行解读,分析AQS源码。
ReentrantLock实现了Lock接口,Lock通过聚合一个AQS的子类Sync实现线程访问的控制。Sync又延申出公平锁和非公平锁。
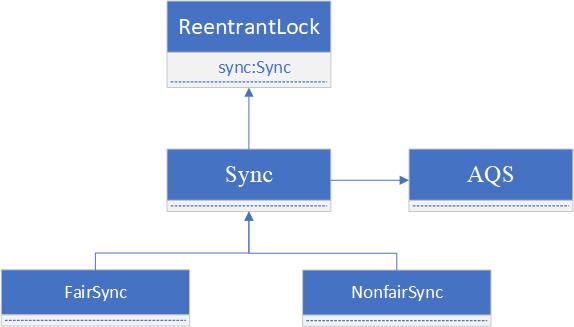
构造方法
我们创建ReentrantLock,默认的构造方法会创建出非公平锁。
public ReentrantLock() {
    sync = new NonfairSync();
}
如果创建公平锁,创建的时候传入true。
public ReentrantLock(boolean fair) {
    sync = fair ? new FairSync() : new NonfairSync();
}
lock()方法
如果调用lock(),可以看见底层调用的是Sync类中的lock()方法。
public void lock() {
    sync.lock();
}
Sync类中的lock()为抽象方法,有公平和非公平两种实现方式,默认为非公平。在非公平锁中,lock()方法中通过compareAndSetState(0, 1)来设置锁的状态,如果state在设置之前的值就是0,那就可以成功修改成1,如果设置之前不是0,则修改失败,其实就是CAS算法。第一个线程抢占锁,compareAndSetState(0,1)设置成功,当前线程抢到锁。第二个线程调用compareAndSetState(0,1)就会设置失败,进而调用acquire(1)。
static final class NonfairSync extends Sync {
    private static final long serialVersionUID = 7316153563782823691L;

    /**
     * Performs lock.  Try immediate barge, backing up to normal
     * acquire on failure.
     */
    final void lock() {
        if (compareAndSetState(0, 1))
            setExclusiveOwnerThread(Thread.currentThread());
        else
            acquire(1);
    }

    protected final boolean tryAcquire(int acquires) {
        return nonfairTryAcquire(acquires);
    }
}
我们看下在公平锁中,lock()就不一样了,方法体内只有acquire()。我们可以先点进acquire(1)看下,进入之后再点击tryAcquire(),就会发现其实是AQS中的方法,只不过AQS这个父类并没有有实现,而是在公平锁类中重写了tryAcquire()。AQS类并没有提供可用的tryAcquire()和tryRelease()发法,正如AQS是锁阻塞和同步器的基本框架一样,tryAcquire()和tryRelease()需要由具体子类实现。
这种设计方式体现出一种设计模式,成为模板设计模式。在模板设计模式中,父类定义了一个算法的骨架,而具体的实现细节则由子类完成。
static final class FairSync extends Sync {
    private static final long serialVersionUID = -3000897897090466540L;

    final void lock() {
        acquire(1);
    }

    /**
     * Fair version of tryAcquire.  Don't grant access unless
     * recursive call or no waiters or is first.
     */
    protected final boolean tryAcquire(int acquires) {
        final Thread current = Thread.currentThread();
        int c = getState();
        if (c == 0) {
            if (!hasQueuedPredecessors() &&
                compareAndSetState(0, acquires)) {
                setExclusiveOwnerThread(current);
                return true;
            }
        }
        else if (current == getExclusiveOwnerThread()) {
            int nextc = c + acquires;
            if (nextc < 0)
                throw new Error("Maximum lock count exceeded");
            setState(nextc);
            return true;
        }
        return false;
    }
}
公平锁和非公平锁的主要区别在于它们在设置state之前的行为。公平锁在尝试获取锁之前,会先调用hasQueuedPredecessors()方法来检查是否有其他线程在等待队列中排队等待获取锁。如果存在前驱节点(即有其他线程在等待队列中),当前线程将不会尝试抢占锁,而是加入到等待队列的末尾,以确保按照请求锁的顺序来分配锁资源,从而实现公平性。
相比之下,非公平锁则没有这个额外的检查步骤。当一个线程尝试获取锁时,它直接尝试通过CAS操作来设置state,以抢占锁资源。这种方式可能导致多个线程同时竞争获取锁,而不考虑它们到达的顺序,因此被称为”群雄逐鹿”。
总结来说,公平锁注重按照请求锁的顺序来分配锁资源,保证先来后到的原则;而非公平锁则允许多个线程自由竞争获取锁资源,不保证请求锁的顺序。
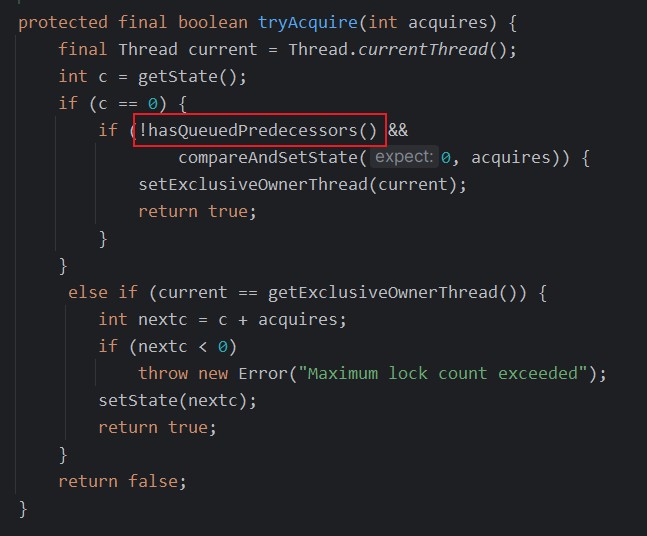
看一下hasQueuedPredecessors(),如果当前线程之前有队列线程,则返回 true;如果当前线程位于队列头部或队列为空,则返回 false。
Returns:
true if there is a queued thread preceding the current thread, and false if the current thread is at the head of the queue or the queue is empty
如果当前线程之前有队列线程,则返回 true;如果当前线程位于队列头部或队列为空,则返回 false
public final boolean hasQueuedPredecessors() {
    // The correctness of this depends on head being initialized
    // before tail and on head.next being accurate if the current
    // thread is first in queue.
    Node t = tail; // Read fields in reverse initialization order
    Node h = head;
    Node s;
    return h != t &&
        ((s = h.next) == null || s.thread != Thread.currentThread());
}
无论是创建公平锁还是非公平锁,调用lock()方法进行加锁,最终都会调用acquire()。
public final void acquire(int arg) {
    if (!tryAcquire(arg) &&
        acquireQueued(addWaiter(Node.EXCLUSIVE), arg))
        selfInterrupt();
}
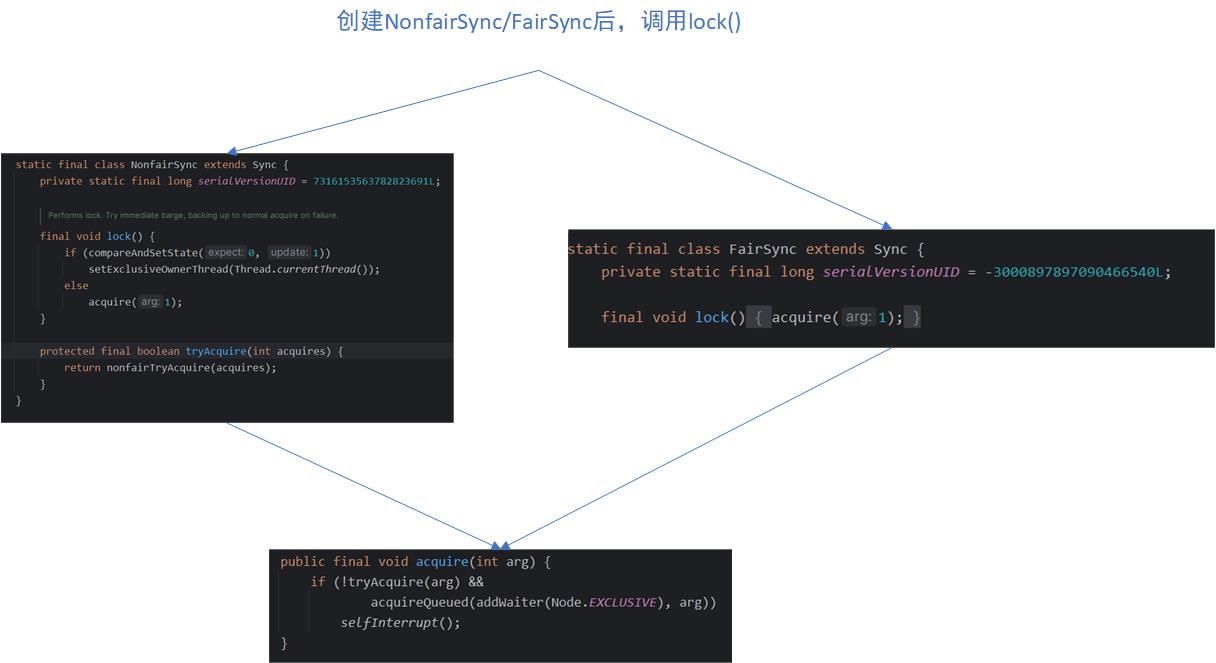
acquire()方法
acquire(1)中有两个方法,分别是tryAcquire()、acquireQueued()以及addWaiter(Node.EXCLUSIVE)。每一个方法都有自己的方法调用流程,我们看一下方法调用流程。
-
tryAcquire()这个方法之前说过,是由父类AQS提供,由
NoFairSync和FairSync两个子类实现方法。如果tryAcquire()抢锁成功返回true,那acquire()方法也就做完了。如果抢锁失败,则执行acquireQueued()。下面是非公平锁调用
tryAcquire()的流程,非公平锁重写了tryAcquire(),在里面调用了nofairTryAcquire(),然后里面就是通过CAS设置线程是否能占用锁。第一个线程抢锁的时候,状态为state为0,调用CAS方法将状态为设置为1,设置成功后调用setExclusiveOwnerThread(),该方法的作用是设置当前拥有独占访问权限的线程。因为ReentrantLock是可重入锁,所以如果判断出state不为0,就会再判断当前线程是否是锁的持有者,如果是就将state加1,增加可重入次数,如果当前线程不是锁的持有者,就return false。公平锁的
tryAcquire()里和非公平锁基本一致,就是多了hasQueuedPredecessors()方法。protected final boolean tryAcquire(int acquires) { return nonfairTryAcquire(acquires); } /** * Performs non-fair tryLock. tryAcquire is implemented in * subclasses, but both need nonfair try for trylock method. */ final boolean nonfairTryAcquire(int acquires) { final Thread current = Thread.currentThread(); int c = getState(); if (c == 0) { if (compareAndSetState(0, acquires)) { setExclusiveOwnerThread(current); return true; } } else if (current == getExclusiveOwnerThread()) { int nextc = c + acquires; if (nextc < 0) // overflow throw new Error("Maximum lock count exceeded"); setState(nextc); return true; } return false; } /** * Sets the thread that currently owns exclusive access. 设置当前拥有独占访问权限的线程。 * A {@code null} argument indicates that no thread owns access. * This method does not otherwise impose any synchronization or * {@code volatile} field accesses. * @param thread the owner thread */ protected final void setExclusiveOwnerThread(Thread thread) { exclusiveOwnerThread = thread; } -
addWaiter(Node.EXCLUSIVE)在多线程环境下,当一个线程(比如线程A)成功获取了锁,而另一个线程(比如线程B)尝试获取锁但没有成功时,线程B会调用
addWaiter(Node.EXCLUSIVE)方法。这里的Node.EXCLUSIVE是Node类中的一个静态属性,它的值为null,这表示线程B正在以独占模式等待获取锁。在
addWaiter()方法中,线程B会检查前驱节点(pred)是否为null。因为线程B是第一个尝试获取锁但失败的线程,所以队列此时应该是空的,因此pred确实为null。在这种情况下,线程B将调用enq(node)方法将自己封装成的节点加入到等待队列中。进入
enq()方法后,线程B首先判断队列的尾节点t是否为null。由于这是线程B首次尝试加入队列,所以t确实为null。然后,线程B调用compareAndSetHead()方法初始化队列,创建了一个新的节点作为头节点,并将tail设置为head。这个新创建的头节点被称为虚拟头节点,它的作用是占位,其Thread字段为null,waitStatus为0。双向链表中,第一个节点为虚节点(也叫哨兵节点),并不存储任何信息,只是占位。真正第一个有数据的节点,是从第二个节点开始。
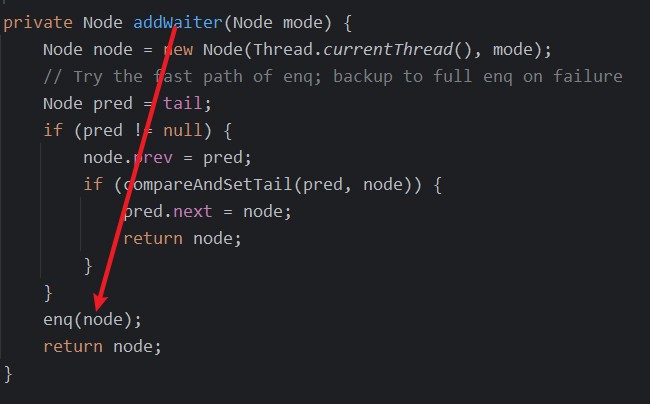
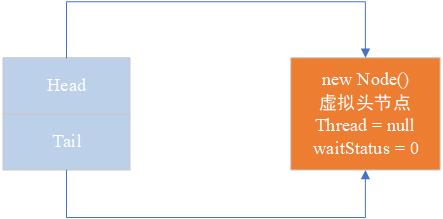
队列初始化完成后,线程B再次进入循环。这次,尾节点t不是null,因此线程B将进入else代码块。在这里,线程B将传入的参数节点(即线程B自己)的prev指向t,也就是新传入的节点的前向指针要指向当前的尾节点。然后,通过CAS算法,线程B尝试将自己设置为新的尾节点。如果成功,最后将原尾节点t的next指针指向线程B。
这样,线程B就成功地将自己以独占模式等待获取锁的状态加入到等待队列中,等待有机会获取锁。

当后续的线程(比如线程C)也尝试获取锁但未能成功时,它们会按照与线程B相同的流程加入到等待队列中。实际上,后续线程的处理流程是固定的。首先,它们会设置当前节点的prev指针,然后通过调用compareAndSetTail()方法来尝试将自身设置为新的tail节点。如果这个操作成功,接下来就会将前一个节点(即原来的尾节点)的next指针指向新来的线程节点,从而将新节点链接到队列中。这样,后续线程就顺利地以独占模式等待获取锁的状态加入到等待队列中,排队等待机会获取锁。
   /**
       * Creates and enqueues node for current thread and given mode.
       * 为当前线程和给定模式创建并入队节点。
       * @param mode Node.EXCLUSIVE for exclusive, Node.SHARED for shared
       * @return the new node
       */
      private Node addWaiter(Node mode) {
          Node node = new Node(Thread.currentThread(), mode);
          // Try the fast path of enq; backup to full enq on failure
          Node pred = tail;
          if (pred != null) {
              node.prev = pred;
              if (compareAndSetTail(pred, node)) {
                  pred.next = node;
                  return node;
              }
          }
          enq(node);
          return node;
      }

  	/**
  		为当前线程和给定模式创建并入队节点。
  		参数:mode - Node.EXCLUSIVE 表示独占模式,Node.SHARED 表示共享模式
  		返回值:新创建的节点
  	*/
  	private Node enq(final Node node) {
          for (;;) {
              Node t = tail;
              if (t == null) { // Must initialize
                  if (compareAndSetHead(new Node()))
                      tail = head;
              } else {
                  node.prev = t;
                  if (compareAndSetTail(t, node)) {
                      t.next = node;
                      return t;
                  }
              }
          }
      }
看这流程有没有蒙,反正我一开始学的时候就很蒙了,大家多理解理解。

-
acquireQueued()在
acquireQueued()方法中,传入参数为addwaiter()返回的节点。以线程B为例。首先,线程B调用predecessor(),得到线程B的前置节点,即虚拟头节点。然后进入if判断,虽然p是头节点,但后面tryAcquire()抢锁失败。接着执行shouldParkAfterFaileAcquire(p, node)方法,此时p就是头节点,也就是线程B的前置节点,而node则是当前线程B。在
shouldParkAfterFaileAcquire(p, node)方法中,会判断p节点的waitStatus。此时waitStatus的值为0,因为节点初始化后waitStatus值为0。进入else代码块后,将p节点的waitStatus设置为Node.SIGNAL。shouldParkAfterFaileAcquire(p, node)返回false,之后继续做一次for循环。再次进入for循环之后,node仍为线程B,调用
predecessor()得到的前置节点仍为虚拟头节点。再次进入shouldParkAfterFaileAcquire(p, node),这次p的waitStatus为-1,等于Node.SIGNAL,方法返回true。接下来进入parkAndCheckInterrupt()方法,调用park()方法,将线程B挂起,使其进入等待状态。当方法返回时,判断线程B是否被中断,如果被中断则返回ture。至此,线程B才算真正进入等候区。

之后,线程C也会进入acquireQueued()方法,它的前置节点为线程B。在调用shouldParkAfterFaileAcquire(p, node)方法后,将B节点的状态设置为Node.SIGNAL。再次进入shouldParkAfterFaileAcquire(p, node)方法后,B节点的状态已经是Node.SIGNAL,然后调用parkAndCheckInterrupt()方法,C节点会调用park()方法进入等待状态。

final boolean acquireQueued(final Node node, int arg) {
    boolean failed = true;
    try {
        boolean interrupted = false;
        for (;;) {
            final Node p = node.predecessor();
            if (p == head && tryAcquire(arg)) {
                setHead(node);
                p.next = null; // help GC
                failed = false;
                return interrupted;
            }
            if (shouldParkAfterFailedAcquire(p, node) &&
                parkAndCheckInterrupt())
                interrupted = true;
        }
    } finally {
        if (failed)
            cancelAcquire(node);
    }
}

private static boolean shouldParkAfterFailedAcquire(Node pred, Node node) {
        int ws = pred.waitStatus;
        if (ws == Node.SIGNAL)
            /*
             * This node has already set status asking a release
             * to signal it, so it can safely park.
             */
            return true;
        if (ws > 0) {
            /*
             * Predecessor was cancelled. Skip over predecessors and
             * indicate retry.
             */
            do {
                node.prev = pred = pred.prev;
            } while (pred.waitStatus > 0);
            pred.next = node;
        } else {
            /*
             * waitStatus must be 0 or PROPAGATE.  Indicate that we
             * need a signal, but don't park yet.  Caller will need to
             * retry to make sure it cannot acquire before parking.
             */
            compareAndSetWaitStatus(pred, ws, Node.SIGNAL);
        }
        return false;
    }
    /**
     * Convenience method to park and then check if interrupted
     *
     * @return {@code true} if interrupted
     */
    private final boolean parkAndCheckInterrupt() {
        LockSupport.park(this);
        return Thread.interrupted();
    }
前面我们讨论了很多内容,从acquire()方法开始。首先,通过tryAcquire()尝试获取锁,如果失败,则通过addWaiter(Node.EXCLUSIVE)创建节点并将其加入队列。然后,调用acquireQueued()方法将抢锁失败的线程挂起。通过这三个方法,实现了将抢锁失败的线程入队的操作。接下来,我们将学习锁释放后,等待队列中的线程如何被唤醒并重新尝试获取锁。
unlock()
现在线程A已经办理完业务,调用unlock()方法释放锁。unlock()方法调用的是Sync的类方法release()。
public void unlock() {
    sync.release(1);
}
release()是AQS提供的方,内部调用tryRelease()方法,与tryAcquire()类似,tryRelease()方法也需要在AQS的实现类重写。当调用release()时,实际上是调用了Sync类重写后的tryRelease()方法。
/**
 * Releases in exclusive mode.  Implemented by unblocking one or
 * more threads if {@link #tryRelease} returns true.
 * This method can be used to implement method {@link Lock#unlock}.
 *
 * @param arg the release argument.  This value is conveyed to
 *        {@link #tryRelease} but is otherwise uninterpreted and
 *        can represent anything you like.
 * @return the value returned from {@link #tryRelease}
 */
public final boolean release(int arg) {
    if (tryRelease(arg)) {
        Node h = head;
        if (h != null && h.waitStatus != 0)
            unparkSuccessor(h);
        return true;
    }
    return false;
}
来看一下在Sync中重写后的tryRelease()方法。现在A线程要准备走了,释放锁。调用getState()方法,此时锁的state为1,传入的releases值也为1,c的值就是0。然后判断当前线程是否是持有锁的线程,如果不是会抛出异常,正常情况下是不会出现这个问题的。之后执行if语句判断c是否为0,此时c就是0,进入代码块中执行setExclusiveOwnerThread(null)方法,这个方法将锁的持有者设置为null。再调用setState(c)将锁的状态设置为0,返回true。至此线程A离开,锁被释放,其他等待线程就可以抢锁了。release()方法中判断tryRelease()返回的是true,就会进入代码块中。将head头节点赋值给h,h不为null并且waitStatus为-1,调用unparkSuccessor(h)。
protected final boolean tryRelease(int releases) {
    int c = getState() - releases;
    if (Thread.currentThread() != getExclusiveOwnerThread())
        throw new IllegalMonitorStateException();
    boolean free = false;
    if (c == 0) {
        free = true;
        setExclusiveOwnerThread(null);
    }
    setState(c);
    return free;
}
protected final void setExclusiveOwnerThread(Thread thread) {
    exclusiveOwnerThread = thread;
}
进入unparkSuccessor(Node node),传入参数为head虚拟头节点,其waitStatus为-1,所以要调用compareAndSetWaitStatus(node, ws, 0),将head的waitStatus设置为0。然后获取node的后置节点,也就是线程B节点。s不为null并且s的waitStatus也不大于0,就不会进入if代码块里。由于s不为null,所以会调用unpark()唤醒B线程。
Wakes up node's successor, if one exists.
Params:
node – the node
private void unparkSuccessor(Node node) {
    /*
     * If status is negative (i.e., possibly needing signal) try
     * to clear in anticipation of signalling.  It is OK if this
     * fails or if status is changed by waiting thread.
     */
    int ws = node.waitStatus;
    if (ws < 0)
        compareAndSetWaitStatus(node, ws, 0);

    /*
     * Thread to unpark is held in successor, which is normally
     * just the next node.  But if cancelled or apparently null,
     * traverse backwards from tail to find the actual
     * non-cancelled successor.
     */
    Node s = node.next;
    if (s == null || s.waitStatus > 0) {
        s = null;
        for (Node t = tail; t != null && t != node; t = t.prev)
            if (t.waitStatus <= 0)
                s = t;
    }
    if (s != null)
        LockSupport.unpark(s.thread);
}
如果锁的可重入次数不为1,也就是state不为1,tryRelease()返回false,release()方法也返回false,释放锁失败。
唤醒B线程之后,回到之前的acquireQueued()方法,B线程会在for循环中继续执行,重新尝试调用tryAcquire()抢锁,这次在if判断中执行tryAcquire()可以成功,再次把锁的state设置为1。
正常情况线程A释放锁之后就该线程B抢到锁了,但是有极端情况,突然来个线程D把锁抢走了,出现这种情况就是因为ReentrantLock是非公平锁,会出现插队的情况。
线程B抢到锁之后就会调用setHead()离开队列里,去窗口办理业务了。在setHead(Node node)中,将线程B设置为头节点,并且将原来B节点的thread属性设置为null,再将B节点的prev属性设置为null。通过setHead()方法的操作,就可以将原来的B节点移除队列,设置新的虚拟头节点。接着会将p节点也就是原来的虚拟头节点的next设置为null,这样队列中就不存在原来的虚拟头节点了,而原来的线程B去窗口办理业务了,他所在的node节点变成了虚拟头节点。上述就是完整的解锁过程。
/**
 * Sets head of queue to be node, thus dequeuing. Called only by
 * acquire methods.  Also nulls out unused fields for sake of GC
 * and to suppress unnecessary signals and traversals.
 *将队列的头部设置为node,从而脱离队列。只能由acquire方法调用。为了GC和抑制不必要的信号和遍历,还将未使用的字段清空。
 * @param node the node
 */
private void setHead(Node node) {
    head = node;
    node.thread = null;
    node.prev = null;
}

抢锁入队和释放锁出队的正常流程都已经走完了,大家好好沉淀沉淀,把这部分捋顺了,也这是一个学习阅读源码的好机会。我们还差一个方法没有看,就是在acquireQueued()方法中failed为true,就会调用cancelAcquire(Node node)方法,来研究一下cancelAcquire(Node node)方法。

cancelAcquire(Node node)
如果现在有三个线程节点在排队,线程A、线程B以及线程C。线程B不想排队,那它退出之后A就得指向C了,这个过程是有一些麻烦的,所以这个取消流程也比较重要。
  private void cancelAcquire(Node node) {
        // Ignore if node doesn't exist
        if (node == null)
            return;

        node.thread = null;

        // Skip cancelled predecessors
        Node pred = node.prev;
        while (pred.waitStatus > 0)
            node.prev = pred = pred.prev;

        // predNext is the apparent node to unsplice. CASes below will
        // fail if not, in which case, we lost race vs another cancel
        // or signal, so no further action is necessary.
        Node predNext = pred.next;

        // Can use unconditional write instead of CAS here.
        // After this atomic step, other Nodes can skip past us.
        // Before, we are free of interference from other threads.
        node.waitStatus = Node.CANCELLED;

        // If we are the tail, remove ourselves.
        if (node == tail && compareAndSetTail(node, pred)) {
            compareAndSetNext(pred, predNext, null);
        } else {
            // If successor needs signal, try to set pred's next-link
            // so it will get one. Otherwise wake it up to propagate.
            int ws;
            if (pred != head &&
                ((ws = pred.waitStatus) == Node.SIGNAL ||
                 (ws <= 0 && compareAndSetWaitStatus(pred, ws, Node.SIGNAL))) &&
                pred.thread != null) {
                Node next = node.next;
                if (next != null && next.waitStatus <= 0)
                    compareAndSetNext(pred, predNext, next);
            } else {
                unparkSuccessor(node);
            }

            node.next = node; // help GC
        }
    }
下面我们分情况讨论

-
队尾5号节点退出
5号节点肯定不为null,将
thread属性设置为null。5号节点的前置节点是4号节点,4号节点的waitStatus不大于0,不会进入循环。4号节点的next为5号节点,将predNext设置为5号节点。将5号节点的waitStatus设置为Node.CANCELLED。进行if判断,node为tail节点然后用caompareAndSetTail(node,pred)将尾节点设置为4号节点。再通过compareAndSetNext(pred,predNext,null)将4号节点的next设置为null。至此,5号节点完成退出。

-
4号节点出队
4号节点的前一个节点是3号节点,正常情况下是不会进入
while循环中的,但是有不正常的情况。4号节点退出的时候,3号节点也要取消,3号节点的waitStatus设置为Node.CANCELLED,所以可以进入while循环中,会把4号节点的prev设置为2号节点,就是要找到前面waitStatus不大于0的节点,也就是没有取消的节点。还是假设3号节点没取消,
pred为3号节点,predNext为4号节点。将4号节点的waitStatus设置为Node.CANCELLED。4号节点不是尾节点,所以进入else代码块。可以通过if判断条件,next赋值为5号节点。if判断也可以进入,就通过compareAndSetNext(pred, predNext, next)方法将3号节点(pred)的下一个节点(predNext)设置为next,也就是5号节点。最后将4号节点的
next设置为node,也就是指向了自己,方便垃圾回收。
总结
整个ReentrantLock的加锁过程,可以分为三阶段:
- 尝试加锁
- 加锁失败,线程入队列
- 线程入队列之后,进入阻塞状态
我在这里给大家放一张加锁和释放锁的流程图,绝对有助于理解整个流程。大家也可以在学完这部分内容之后画一张流程图,梳理一下脉络。
大多数开发者可能永远不会直接使用AQS,但是直到AQS原理对于架构设计非常有帮助,学习之后我都觉得我长脑子了。


