对于前端开发中面向移动端的人员来说让前端应用适配不同的机型是一个较为广泛的问题,那么今天我们就来讲一下有关于:“Html5怎么适配移动端的各种手机机型?案例分析详解!”这方面的相关内容!
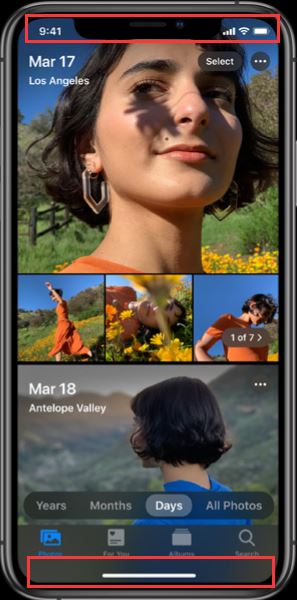
首先我们来看下iPhone X机型的样子:

上图中,Iphonex机型在头部和底部新增了这两个区域,所以我们需要针对这类机型做些适配,方便我们的webapp的展示
h5做成的移动端页面,常见布局为头部+躯干+底部三栏模式,头部和顶部都是固定定位,躯干可里的内容可以滚动,暂定的布局如下:
<div class="page">
    <header></header>
    <main></main>
    <footer></footer>
  </div>
但如果没采用IphoneX机型的新的css属性,而直接采用position: fixed;top:0等常规写法,就会出现头部的导航栏被手机自带的状态栏(显示电量信号等等)遮挡的情况,底部的导航栏被IphoneX自带的呼吸灯(图中手机底部的白条)遮挡的情况,给用户的操作和体验带来困扰,目前针对这类问题,根据自己做过的项目,整理了一下几种解决方案
我使用的是vue框架,在index.html页面,我们需要添加:
<meta name="viewport" content="width=device-width,viewport-fit=cover">然后,在公共的app.vue页面,我们每个组件的展示,都是在这里被router-view替换,所以可以在这里处理一下公共的头部顶栏,具体的布局如下:
<template>
<div id="app">
<div class="placeholder_top" :style="{position:fixpositiona?'absolute':'fixed'}"></div>
<router-view  class="routerview"></router-view>
</div>
</template>
上面的布局中,我们给class为placeholder_top的div写下如下:
.placeholder_top {
  position: fixed;
  top: 0;
  left: 0;
  width: 10rem;
  background-color: #303030;
  height: constant(safe-area-inset-top);
  height: env(safe-area-inset-top);
  z-index: 999;
}
这样的话,我们后续,单独的组件,就不用再处理这个顶部栏的问题,那下面,我们就可以处理下前面提到的头部问题,一般头部,我们大多都会封装成公共组件,所以在这里,因为受到我们在app.vue页面插入的那个元素的影响,我们的头部的css写法,也需要略微改动下,头部组件页面布局如下:
<template>
<header>
    <div class="title" :style="{position:fixposition?'absolute':'fixed'}">
    导航内容
    </div>
    <div class="placeholder"></div>
    </header>
</template>
页面的css为:
header{
background-color: #303030;
    .title{
    position: fixed;
    top:0;
    top: constant(safe-area-inset-top);
    top: env(safe-area-inset-top);
    left: 0;
    height:88px;
    z-index: 999;
    }
    .placeholder{
    height: 88px;
    width: 10rem;
    }
}
这样写,这个头部导航栏就会位居于手机状态栏之下了,不会影响到视窗,并且能兼容安卓和ios机型(这类兼容问题,还涉及到ios的系统问题,不过本文暂未涉及)。
下面再来看下main区域的处理,因为上面header组件已经处理好了,所以main直接如下布局:
  main {
padding-top: constant(safe-area-inset-top);
padding-top: env(safe-area-inset-top);
padding-bottom: calc(88px + constant(safe-area-inset-bottom));
padding-bottom: calc(88px + env(safe-area-inset-bottom));
ps:这里说明一下,下面的两行,是用在当前页面没有底部导航栏的情况:
padding-bottom: constant(safe-area-inset-bottom);
padding-bottom: env(safe-area-inset-bottom);
},
main里面布局好了,直接写内容就可以了,
然后在看下底部的footer布局:
<template>
<footer>
    <div class="foot" :style="{position:fixposition?'absolute':'fixed'}">
    底部内容
    </div>
</footer>
</template>
底部内容的css如下:
footer{
    position: fixed;
    bottom: 0;
    left: 0;
    width: 10rem;
    height: calc(88px + constant(safe-area-inset-bottom));
    height: calc(88px + env(safe-area-inset-bottom));
    background-color: #303030;
    .foot{
    position: absolute;
    top:0;
    left: 0;
    width: 10rem;
    height: 88px;
    }
}
这样写,底部导航foot里的内容,就不会被手机自带的呼吸灯所遮挡。
所以可以总结一下,我们在这种webapp适配中,可能需要采用的css写法如下:
    position: fixed;
    top: constant(safe-area-inset-top);
    top: env(safe-area-inset-top);
    bottom: constant(safe-area-inset-bottom);
    bottom: env(safe-area-inset-bottom);
    top: calc(1rem + constant(safe-area-inset-top));
    top: calc(1rem + env(safe-area-inset-top));
    bottom: calc(1rem + constant(safe-area-inset-bottom));
    bottom: calc(1rem + env(safe-area-inset-bottom));
ps:在上面的写法中,有写到:style=”{position:fixposition?’absolute’:’fixed’}”,这个是为了解决用户点击输入框,弹出软键盘时,这类固定元素的定位不准的问题,感兴趣的可以研究下,本文暂不讨论
这里可以根据实际需求来采用不同的写法,大体布局逻辑建议不要偏差太大,这样写是为了统一处理,方便维护,另外如果有真机测试,发现布局兼容导致的样式问题,可以采用真机调试方法,用pc端浏览器调试webapp,审查元素,那样基本能解决大部分样式问题,关于真机调试,下回写
那么以上就是小编为大家介绍整理的有关于:“Html5怎么适配移动端的各种手机机型?案例分析详解!”这方面的内容,希望小编的分享对大家的学习有所帮助,当然了我们在html5使用与开发的时候问题不仅仅如此还有更多有趣的东西等着大家去发现,更多有关于HTML5这个方面的相关内容我们都可以在W3Cschool中进行学习和了解!


