同宿主机不同POD之间的连通性分析
该实验在宿主机1上进行,该宿主机ens33网卡的ip地址为192.168.30.211
实验步骤1-创建网络空间,设备,并配置
HOST_IP=$( hostname -I | awk  '{print $1}')
POD1_IP=10.96.30.11
POD2_IP=10.96.30.12
GATEWAY_IP=169.254.1.1
#1. 创建network namespace
    ip netns add pod1
    ip netns add pod2
#2. 创建veth pair 并加入到namespace
    ip link add eth0 type veth peer name eth0-p1
    ip link set eth0 netns pod1
    ip link add eth0 type veth peer name eth0-p2
    ip link set eth0 netns pod2
    #配置设备IP地址
    ip netns exec pod1 ip addr add $POD1_IP/24 dev eth0
    ip netns exec pod2 ip addr add $POD2_IP/24 dev eth0
    #启动设备
    ip netns exec pod1 ip link set eth0 up
    ip netns exec pod2 ip link set eth0 up
    ip link set eth0-p1 up
    ip link set eth0-p2 up
    #启动回环设备
    ip netns exec pod1 ip link set lo up
    ip netns exec pod2 ip link set lo up

    #为设备添加路由--必须先添加默认设备端口,否则报网络不可达
    ip netns exec pod1 ip route add $GATEWAY_IP dev eth0 scope link
    ip netns exec pod2 ip route add $GATEWAY_IP dev eth0 scope link

    ip netns exec pod1 ip route add default via $GATEWAY_IP dev eth0
    ip netns exec pod2 ip route add default via $GATEWAY_IP dev eth0
#3. 设置veth pair 的proxy arp
    echo 1 > /proc/sys/net/ipv4/conf/eth0-p1/proxy_arp
    echo 1 > /proc/sys/net/ipv4/conf/eth0-p2/proxy_arp
#4. 设置主机路由
    ip route add $POD1_IP dev eth0-p1
    ip route add $POD2_IP dev eth0-p2
实验步骤2-在pod1中ping pod2测试两个ns是否连通,同时在四个设备上抓包:
ip netns  exec pod1 ping -c 1 10.96.30.12

#pod1 eth0设备抓包
ip netns exec pod1 tcpdump -pne -i eth0

#eth0-p1设备抓包
tcpdump -pne -i eth0-p1

#pod2 eth0设备抓包
ip netns exec pod2 tcpdump -pne -i eth0

#eth0-p1设备抓包
tcpdump -pne -i eth0-p2
pod1 eth0设备抓包内容:
10:34:36.866502 d2:3a:94:8c:41:e5 > Broadcast, ethertype ARP (0x0806), length 42: Request who-has 10.96.30.12 tell 10.96.30.11, length 28
10:34:36.921359 0e:05:60:f2:ac:47 > d2:3a:94:8c:41:e5, ethertype ARP (0x0806), length 42: Reply 10.96.30.12 is-at 0e:05:60:f2:ac:47, length 28
10:34:36.921395 d2:3a:94:8c:41:e5 > 0e:05:60:f2:ac:47, ethertype IPv4 (0x0800), length 98: 10.96.30.11 > 10.96.30.12: ICMP echo request, id 19231, seq 1, length 64
10:34:36.921484 0e:05:60:f2:ac:47 > d2:3a:94:8c:41:e5, ethertype IPv4 (0x0800), length 98: 10.96.30.12 > 10.96.30.11: ICMP echo reply, id 19231, seq 1, length 64
10:34:42.174413 0e:05:60:f2:ac:47 > d2:3a:94:8c:41:e5, ethertype ARP (0x0806), length 42: Request who-has 10.96.30.11 tell 192.168.30.211, length 28
10:34:42.174449 d2:3a:94:8c:41:e5 > 0e:05:60:f2:ac:47, ethertype ARP (0x0806), length 42: Reply 10.96.30.11 is-at d2:3a:94:8c:41:e5, length 28
eth0-p1抓包内容:
10:34:36.866524 d2:3a:94:8c:41:e5 > Broadcast, ethertype ARP (0x0806), length 42: Request who-has 10.96.30.12 tell 10.96.30.11, length 28
10:34:36.921343 0e:05:60:f2:ac:47 > d2:3a:94:8c:41:e5, ethertype ARP (0x0806), length 42: Reply 10.96.30.12 is-at 0e:05:60:f2:ac:47, length 28
10:34:36.921397 d2:3a:94:8c:41:e5 > 0e:05:60:f2:ac:47, ethertype IPv4 (0x0800), length 98: 10.96.30.11 > 10.96.30.12: ICMP echo request, id 19231, seq 1, length 64
10:34:36.921483 0e:05:60:f2:ac:47 > d2:3a:94:8c:41:e5, ethertype IPv4 (0x0800), length 98: 10.96.30.12 > 10.96.30.11: ICMP echo reply, id 19231, seq 1, length 64
10:34:42.174397 0e:05:60:f2:ac:47 > d2:3a:94:8c:41:e5, ethertype ARP (0x0806), length 42: Request who-has 10.96.30.11 tell 192.168.30.211, length 28
10:34:42.174450 d2:3a:94:8c:41:e5 > 0e:05:60:f2:ac:47, ethertype ARP (0x0806), length 42: Reply 10.96.30.11 is-at d2:3a:94:8c:41:e5, length 28
eth0-p2抓包内容:
10:34:36.921439 d2:e5:fb:a0:e6:c7 > Broadcast, ethertype ARP (0x0806), length 42: Request who-has 10.96.30.12 tell 192.168.30.211, length 28
10:34:36.921453 3e:63:d4:1b:a8:b0 > d2:e5:fb:a0:e6:c7, ethertype ARP (0x0806), length 42: Reply 10.96.30.12 is-at 3e:63:d4:1b:a8:b0, length 28
10:34:36.921455 d2:e5:fb:a0:e6:c7 > 3e:63:d4:1b:a8:b0, ethertype IPv4 (0x0800), length 98: 10.96.30.11 > 10.96.30.12: ICMP echo request, id 19231, seq 1, length 64
10:34:36.921478 3e:63:d4:1b:a8:b0 > d2:e5:fb:a0:e6:c7, ethertype IPv4 (0x0800), length 98: 10.96.30.12 > 10.96.30.11: ICMP echo reply, id 19231, seq 1, length 64
10:34:42.174426 3e:63:d4:1b:a8:b0 > d2:e5:fb:a0:e6:c7, ethertype ARP (0x0806), length 42: Request who-has 10.96.30.11 tell 10.96.30.12, length 28
10:34:42.174456 d2:e5:fb:a0:e6:c7 > 3e:63:d4:1b:a8:b0, ethertype ARP (0x0806), length 42: Reply 10.96.30.11 is-at d2:e5:fb:a0:e6:c7, length 28
pod2 eth0抓包内容:
10:34:36.921442 d2:e5:fb:a0:e6:c7 > Broadcast, ethertype ARP (0x0806), length 42: Request who-has 10.96.30.12 tell 192.168.30.211, length 28
10:34:36.921451 3e:63:d4:1b:a8:b0 > d2:e5:fb:a0:e6:c7, ethertype ARP (0x0806), length 42: Reply 10.96.30.12 is-at 3e:63:d4:1b:a8:b0, length 28
10:34:36.921456 d2:e5:fb:a0:e6:c7 > 3e:63:d4:1b:a8:b0, ethertype IPv4 (0x0800), length 98: 10.96.30.11 > 10.96.30.12: ICMP echo request, id 19231, seq 1, length 64
10:34:36.921477 3e:63:d4:1b:a8:b0 > d2:e5:fb:a0:e6:c7, ethertype IPv4 (0x0800), length 98: 10.96.30.12 > 10.96.30.11: ICMP echo reply, id 19231, seq 1, length 64
10:34:42.174421 3e:63:d4:1b:a8:b0 > d2:e5:fb:a0:e6:c7, ethertype ARP (0x0806), length 42: Request who-has 10.96.30.11 tell 10.96.30.12, length 28
10:34:42.174457 d2:e5:fb:a0:e6:c7 > 3e:63:d4:1b:a8:b0, ethertype ARP (0x0806), length 42: Reply 10.96.30.11 is-at d2:e5:fb:a0:e6:c7, length 28
实验分析:
1.pod1 发送icmp包
pod1不知道10.96.30.12这个ip地址对应的mac地址,无法完成以太网帧,因此会先通过arp协议转换
1.1 pod1中的eth0网卡发出arp请求(为什么从eth0发出?pod1配置了默认路由,从eth0接口发出)
1.2 eth0-p1所在的宿主机因为收到arp请求, 会自动更新自己的arp表项:(10.96.30.11) at d2:3a:94:8c:41:e5 [ether] on eth0-p1
1.3 eth0-p1开启了 proxy arp,因此用自己的mac回复该arp请求
1.4 pod1得到回复后,更新自己的arp表,表项为:(10.96.30.12) at 0e:05:60:f2:ac:47 [ether] on eth0 。其实eth0被eth0-p1骗了
2. pod1的arp完成,紧接着发出icmp包(ping echo),该网络包自然会到达eth0-p1
3. eth0-p1是宿主机网卡,宿主机收到该icmp包,并且由于宿主机开启了ip forward 因此会转发该包。
宿主机转发icmp包时,宿主机自己也不知道10.96.30.12的mac,因此宿主机发出arp广播请求
3.1. 该arp广播请求从eth0-p2发出,为什么?因为宿主机配置了路由,所有到10.96.30.12的包从eth0-p2接口出去
3.2. eth0-p2发出arp广播包(Request who-has 10.96.30.12 tell 192.168.30.211),pod2中的eth0回复该请求(Reply 10.96.30.12 is-at 3e:63:d4:1b:a8:b0)
3.3. eth0-p2收到回复,亦即宿主机收到回复,宿主机更新自己的arp表,表项为:(10.96.30.12) at 3e:63:d4:1b:a8:b0 [ether] on eth0-p2
3.4 宿主机将icmp包装入以太网帧并发出
4. pod2中的eth0收到该icmp包,发现是在ping自己,因此回复该icmp包
pod2自己也不知道10.96.30.11的mac,因此发出arp广播请求
4.1. 该arp广播请求从eth0发出
4.2. eth0-p2收到arp广播包,由于自己开启了proxy arp 因此eth0-p2用自己的mac回复该arp广播
4.3. pod2中的eth0收到回复,更新自己的arp表,表项为: (10.96.30.11) at d2:e5:fb:a0:e6:c7 [ether] on eth0
4.4 pod2将icmp回复包装入以太网帧并发出给eth0-p2
5. 宿主机的eth0-p2收到pod2回复的icmp包,由于自己开启了ip forward,因此会转发该包,同时由于宿主机知道10.96.30.11的mac(arp表项已经存在),便直接封装成以太网帧通过eth0-p1发送(路由表知道10.96.30.11需要通过该接口发送,arp表中也有)
6. pod1中eth0收到icmp回复,至此ping完成。
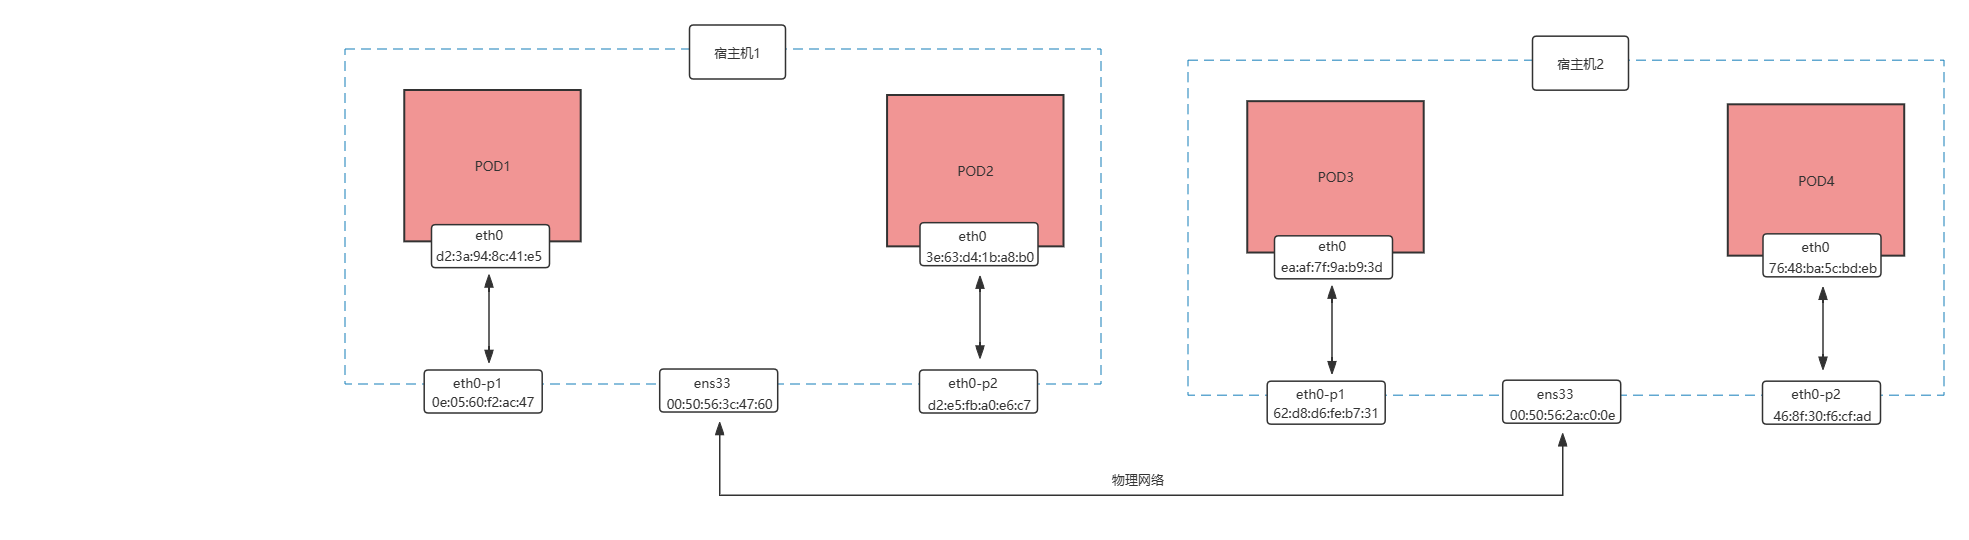
不同宿主机不同POD之间的连通性分析
该实验在宿主机1和宿主机2上同时进行,宿主机1的ens33网卡的ip地址为192.168.30.211,宿主机2的ens33网卡的ip地址为192.168.30.212
1. 在宿主机1上执行:
HOST_IP=$( hostname -I | awk  '{print $1}')
POD1_IP=10.96.30.11
POD2_IP=10.96.30.12
GATEWAY_IP=169.254.1.1
#1. 创建network namespace
    ip netns add pod1
    ip netns add pod2
#2. 创建veth pair 并加入到namespace
    ip link add eth0 type veth peer name eth0-p1
    ip link set eth0 netns pod1
    ip link add eth0 type veth peer name eth0-p2
    ip link set eth0 netns pod2
    #配置设备IP地址
    ip netns exec pod1 ip addr add $POD1_IP/24 dev eth0
    ip netns exec pod2 ip addr add $POD2_IP/24 dev eth0
    #启动设备
    ip netns exec pod1 ip link set eth0 up
    ip netns exec pod2 ip link set eth0 up
    ip link set eth0-p1 up
    ip link set eth0-p2 up
    #启动回环设备
    ip netns exec pod1 ip link set lo up
    ip netns exec pod2 ip link set lo up

    #为设备添加路由--必须先添加默认设备端口,否则报网络不可达
    ip netns exec pod1 ip route add $GATEWAY_IP dev eth0 scope link
    ip netns exec pod2 ip route add $GATEWAY_IP dev eth0 scope link

    ip netns exec pod1 ip route add default via $GATEWAY_IP dev eth0
    ip netns exec pod2 ip route add default via $GATEWAY_IP dev eth0
#3. 设置veth pair 的proxy arp
    echo 1 > /proc/sys/net/ipv4/conf/eth0-p1/proxy_arp
    echo 1 > /proc/sys/net/ipv4/conf/eth0-p2/proxy_arp
#4. 设置主机路由
    ip route add $POD1_IP dev eth0-p1
    ip route add $POD2_IP dev eth0-p2
#5. 设置路由
    ip route add 10.96.30.13 via 192.168.30.212 dev ens33
    ip route add 10.96.30.14 via 192.168.30.212 dev ens33
2. 在宿主机2上执行:
HOST_IP=$( hostname -I | awk  '{print $1}')
POD1_IP=10.96.30.13
POD2_IP=10.96.30.14
GATEWAY_IP=169.254.1.1
#1. 创建network namespace
    ip netns add pod1
    ip netns add pod2
#2. 创建veth pair 并加入到namespace
    ip link add eth0 type veth peer name eth0-p1
    ip link set eth0 netns pod1
    ip link add eth0 type veth peer name eth0-p2
    ip link set eth0 netns pod2
    #配置设备IP地址
    ip netns exec pod1 ip addr add $POD1_IP/24 dev eth0
    ip netns exec pod2 ip addr add $POD2_IP/24 dev eth0
    #启动设备
    ip netns exec pod1 ip link set eth0 up
    ip netns exec pod2 ip link set eth0 up
    ip link set eth0-p1 up
    ip link set eth0-p2 up
    #启动回环设备
    ip netns exec pod1 ip link set lo up
    ip netns exec pod2 ip link set lo up

    #为设备添加路由--必须先添加默认设备端口,否则报网络不可达
    ip netns exec pod1 ip route add $GATEWAY_IP dev eth0 scope link
    ip netns exec pod2 ip route add $GATEWAY_IP dev eth0 scope link

    ip netns exec pod1 ip route add default via $GATEWAY_IP dev eth0
    ip netns exec pod2 ip route add default via $GATEWAY_IP dev eth0
#3. 设置veth pair 的proxy arp
    echo 1 > /proc/sys/net/ipv4/conf/eth0-p1/proxy_arp
    echo 1 > /proc/sys/net/ipv4/conf/eth0-p2/proxy_arp
#4. 设置主机路由
    ip route add $POD1_IP dev eth0-p1
    ip route add $POD2_IP dev eth0-p2
#5. 设置路由
    ip route add 10.96.30.11 via 192.168.30.211 dev ens33
    ip route add 10.96.30.12 via 192.168.30.211 dev ens33
读者可自行分析 不同宿主机上的pod之间的连通性
附录:
1. 查看 arp表项:arp -an
2. 清空arp缓存: ip neigh flush
2. 查看路由表: route -n